It's been a little over a year since I relieved some weight from the double-wall Fat Tandem rims. Yesterday I picked up the rims from the powdercoater and today I finally built up the wheels.
The rims are Weinmann DHL101 32 hole, double-wall, 100mm wide. I had them painted to match Jagwire's "Maxxis Orange" shift cable housing and hydro brake hose. They are laced up to Hope hubs. 197x12 in the rear and 142x15 in the front. Spokes are DT Swiss Alpine III triple butted with brass nipples. The hub/spokes/nipples/rim weighs in at 4.25 lbs for the rear, and 4 lbs for the front. Not light, but they are tandem duty, right?! The rear rotor is 185mm and the front is a 200. I'll have a Bud on the front and a Lou on the rear.
I have most of the tubes mitered for the frame, but need to practice my brazing before I go to work on the frame. It has been a while since I have had a torch in my hand and it wouldn't be a bad idea to give myself a refresher.
Progress is being made!
Thursday, March 13, 2014

Saturday, August 31, 2013
Jessica's Bike, Updated
Here is a quick and much overdue update on Jessica's bike:

Last year, after about a month of having the bike and riding just about every day, Jessica put her foot into her front wheel whilst riding one day. This resulted in what must have been a spectacular ejection from the bicycle. She is fine, though she jacked up her shoulder a bit and got a small cut on her temple from her eyeglasses breaking when they were crunched between her head and the concrete. That was near a year ago, and her shoulder is fine now. The bicycle frame held up fine in the crash, but the fork didn't fare so well. When I was building the fork, it took about a four foot lever to bend the steel fork blades to put the rake/curve into the tubes. When Jessica crashed, her foot/leg/body served as about a 5'2" lever on those fork blades, taking darn near all of the rake out. Perhaps I could have re-raked the fork, but I figured better safe than sorry, and I built her a new fork.
The bike has since had a rattle-can paint job in "Fern" green, had the black fenders replaced with silver, and I made a stainless steel front rack for it. The platform of the rack is just big enough to support a six pack, and with the low riders, can also mount panniers.
Thursday, March 14, 2013
If You Weren't Out Riding This Morning, You Missed Out
Ok, bear with me here. I can't be bothered to edit videos--I already spend too much of my life in front of a computer, eh. Also, I think your biking videos with whatever music you think is cool at the time can often be a bit lame, but...
Try this:
Load this video (the first one below), but pause it before it plays. Set the volume on this YouTube video to about 25%.
Then, in another tab (or below), load this video (the second video below), ensure the volume is at 100%, and your speakers are cranked. Skip the ad if there is one, and once the music starts playing, go back to the first tab, hit play, and perhaps put it to full screen.
Make sure you adjust the volumes as directed.
If you do this correctly, you will see a biking vid whilst listening to music. If you don't like my music choice, pick your own!
Enjoy. You should have been out riding at Lebanon Hills this morning--it was great.
Try this:
Load this video (the first one below), but pause it before it plays. Set the volume on this YouTube video to about 25%.
Then, in another tab (or below), load this video (the second video below), ensure the volume is at 100%, and your speakers are cranked. Skip the ad if there is one, and once the music starts playing, go back to the first tab, hit play, and perhaps put it to full screen.
Make sure you adjust the volumes as directed.
If you do this correctly, you will see a biking vid whilst listening to music. If you don't like my music choice, pick your own!
Enjoy. You should have been out riding at Lebanon Hills this morning--it was great.
Homebrew Studded Fat Tires
Last winter the fat bike rolled on a set of (the now discontinued) Surly Endomorph tires. Whilst they were a great, fast rolling tire for hard-pack dirt in the summer, they did suck a bit in the snow. This winter I decided to get some knobby tires, so I put a Surly Bud up front and an Origin 8 Devastator UL in the rear. I figured this way I wouldn't have to worry about my front tire washing out in the corners, and I would get some much needed traction in the rear. Combining an Endomorph with my 2x1 speed Hammerschmidt drivetrain often left my rear tire to slip when going up hills in the snow as I don't have as low of an easy gear as your average multi-speed bike.
Having switched to the knobbies for the winter, there was an immediately noticeable increase in rolling resistance. It was enough that I would have increase tire pressure or change my rear cog. Or use a different tire. After riding my Endomorphs on the dirt during the summer, they were 1/2 shagged, and not worthy of use in the snow anymore. I also rode a lot of icy trails last year, and was wishing I could have some studded tires as well. The thought to stud out the Endos had occurred to me, but the knobs were small to start with, and now they were half worn out. I wanted and aggressive stud, and I didn't think the lugs would support much.
Here is what I came up with:

50 studs per tire, adding 1/2lb per tire, and costing a smidge over $25 per tire. The studs are not in the lug of the tire, but through the casing, between the lugs/knobs. If I do say so myself, they are supurb for hardpacked/groomed trails and ice. I have got to say it is rather fun being able to rail the corners while others have to take it easy. If you have inches of fresh snow, they are terrible. I will probably have a second set of wheels for next year with the knobby tires mounted to them so I can change out tires quick and easy depending on the days conditions. One would not want to ride these on anything but snow or ice. Not across the parking lot to the trail head, not on streets or paved trails, and not across the exposed rocks on the trail, if you can avoid it!
Also, I have only tested these on about a handful of times in the last half of this winter. The front tire seems to be fine with my construction method, but the rear needs some improvement as I have lost about five or so studs from the tire. One was lost when I attempted a log ride, and in realizing my rear tire was going to slide of, I locked up the rear brake in trying to save myself. When the tire slid off the log, with all of my weight still on the bike, one of the studs grabbed in the log, and pulled out of the tire. The other missing studs... well, I can't say what happened to them, but they are no longer in the tire!
Riff on this approach if you are interested in making your own homebrew studded fat tires, eh:
Gather your supplies.
1) 100 steel caulks (50 per tire). Caulks are apparently used in the soles of boots for lumberjacks and jills. I got a pack of 100 to do both tires from these folks: http://www.labonville.com/Steel-Spikes--SS1_p_267.html $18.95
2) A spike wrench. You could do it without one, but you wouldn't want to have to. And they are not expensive. http://www.labonville.com/Pro-Wrench-for-Spikes--SW2_p_268.html $5.95
3) 100 nuts (50 per tire). The Caulks have a funny thread to them that is not commonly available. The ones I purchased were M6x.75. Coincidentally, this is the same threading as a presta valve nut, though I wouldn't use these even if you had 100 of them as they would be difficult to fully tighten. McMaster-Carr had one option for M6x.75 nuts, of which I purchased two 50 packs. http://www.mcmaster.com/#91415A040 2 x $7.39/ea
4) Caulk. Not the spike caulks previously mentioned, but the kitchen and bath kind. This is to cover over the nut on the inside of the tire so the tube isn't punctured by any sharp edges. There is probably a better product for this, but I happened to have a tube open and available in my shop.
5) Duct tape. This is to cover the caulked caulk nuts. Just to be sure I don't puncture any $16 fat bike tubes, eh.
6) A drill bit and drill. If you don't already have these tools, wtf are you doing making your own studded tires?
7) 10mm socket on a ratchet, probably with an extension.
8) Several beers and several hours of free time to kill.

The instructions are even easier than the supplies list. Drill undersized holes. Curse me and my stupid idea as you struggle to get those damn caulks inserted into the tire. Use the spike wrench and a clockwise twisting motion. You really do not want the drilled holes any larger than they absolutely have to be. Hand thread on the nut, then really tighten the heck out of it with the ratchet and spike wrench to ensure the caulk is fully installed. In my case, the threaded stud of the caulk was flush with the nut when fully tightened. Cover nutted caulk with caulk - make it smooth! Allow caulk to cure (took me two days). Cover caulked caulk nuts with a square of duct tape. Sweep up all the little bits of drilled rubber off the living room floor before your old lady gets pissed at you about it. Put your tools away. Install tires on wheels, as per usual. Go ride a bike, eh!

P.s. these bad motha truckas are sharp as can be. I had a get-off whilst attempting to ride in a few inches of fresh snow (not recommended, see above). When I went off trail, my bicycle stopped, I kept going, and my knee hit my front tire. Normally not a big deal, unless of course, you have 3/8" needle sharp spikes in your tires. If you stud your tires in this way, you are pretty much guaranteed to either draw blood, or destroy a nice, fancy piece of expensive technical clothing. Consider yourself forewarned.

Disclaimer: You are an adult, you can make your own choices. Go ahead, jump off this homebrew studded fat tire bridge because I told you to.
Having switched to the knobbies for the winter, there was an immediately noticeable increase in rolling resistance. It was enough that I would have increase tire pressure or change my rear cog. Or use a different tire. After riding my Endomorphs on the dirt during the summer, they were 1/2 shagged, and not worthy of use in the snow anymore. I also rode a lot of icy trails last year, and was wishing I could have some studded tires as well. The thought to stud out the Endos had occurred to me, but the knobs were small to start with, and now they were half worn out. I wanted and aggressive stud, and I didn't think the lugs would support much.
Here is what I came up with:
50 studs per tire, adding 1/2lb per tire, and costing a smidge over $25 per tire. The studs are not in the lug of the tire, but through the casing, between the lugs/knobs. If I do say so myself, they are supurb for hardpacked/groomed trails and ice. I have got to say it is rather fun being able to rail the corners while others have to take it easy. If you have inches of fresh snow, they are terrible. I will probably have a second set of wheels for next year with the knobby tires mounted to them so I can change out tires quick and easy depending on the days conditions. One would not want to ride these on anything but snow or ice. Not across the parking lot to the trail head, not on streets or paved trails, and not across the exposed rocks on the trail, if you can avoid it!
Also, I have only tested these on about a handful of times in the last half of this winter. The front tire seems to be fine with my construction method, but the rear needs some improvement as I have lost about five or so studs from the tire. One was lost when I attempted a log ride, and in realizing my rear tire was going to slide of, I locked up the rear brake in trying to save myself. When the tire slid off the log, with all of my weight still on the bike, one of the studs grabbed in the log, and pulled out of the tire. The other missing studs... well, I can't say what happened to them, but they are no longer in the tire!
Riff on this approach if you are interested in making your own homebrew studded fat tires, eh:
Gather your supplies.
1) 100 steel caulks (50 per tire). Caulks are apparently used in the soles of boots for lumberjacks and jills. I got a pack of 100 to do both tires from these folks: http://www.labonville.com/Steel-Spikes--SS1_p_267.html $18.95
2) A spike wrench. You could do it without one, but you wouldn't want to have to. And they are not expensive. http://www.labonville.com/Pro-Wrench-for-Spikes--SW2_p_268.html $5.95
3) 100 nuts (50 per tire). The Caulks have a funny thread to them that is not commonly available. The ones I purchased were M6x.75. Coincidentally, this is the same threading as a presta valve nut, though I wouldn't use these even if you had 100 of them as they would be difficult to fully tighten. McMaster-Carr had one option for M6x.75 nuts, of which I purchased two 50 packs. http://www.mcmaster.com/#91415A040 2 x $7.39/ea
4) Caulk. Not the spike caulks previously mentioned, but the kitchen and bath kind. This is to cover over the nut on the inside of the tire so the tube isn't punctured by any sharp edges. There is probably a better product for this, but I happened to have a tube open and available in my shop.
5) Duct tape. This is to cover the caulked caulk nuts. Just to be sure I don't puncture any $16 fat bike tubes, eh.
6) A drill bit and drill. If you don't already have these tools, wtf are you doing making your own studded tires?
7) 10mm socket on a ratchet, probably with an extension.
8) Several beers and several hours of free time to kill.
The instructions are even easier than the supplies list. Drill undersized holes. Curse me and my stupid idea as you struggle to get those damn caulks inserted into the tire. Use the spike wrench and a clockwise twisting motion. You really do not want the drilled holes any larger than they absolutely have to be. Hand thread on the nut, then really tighten the heck out of it with the ratchet and spike wrench to ensure the caulk is fully installed. In my case, the threaded stud of the caulk was flush with the nut when fully tightened. Cover nutted caulk with caulk - make it smooth! Allow caulk to cure (took me two days). Cover caulked caulk nuts with a square of duct tape. Sweep up all the little bits of drilled rubber off the living room floor before your old lady gets pissed at you about it. Put your tools away. Install tires on wheels, as per usual. Go ride a bike, eh!
P.s. these bad motha truckas are sharp as can be. I had a get-off whilst attempting to ride in a few inches of fresh snow (not recommended, see above). When I went off trail, my bicycle stopped, I kept going, and my knee hit my front tire. Normally not a big deal, unless of course, you have 3/8" needle sharp spikes in your tires. If you stud your tires in this way, you are pretty much guaranteed to either draw blood, or destroy a nice, fancy piece of expensive technical clothing. Consider yourself forewarned.
Disclaimer: You are an adult, you can make your own choices. Go ahead, jump off this homebrew studded fat tire bridge because I told you to.
Wednesday, February 27, 2013
I Am Officially Commited
I will build a fat bike tandem. I have purchased parts that I can no longer return--there is no turning back now!

What you see here are a couple of Weinmann DHL 101 double wall 32h rims that have been relieved of over 1/2 a pound each. A one inch end mill on my buddies Bridgeport made quick work of the rims. Get a good look now, because this will be the last time these cut outs see the light of day. These puppies should still be plenty strong for tandem duty, yet save some of that rotational mass.
What you see here are a couple of Weinmann DHL 101 double wall 32h rims that have been relieved of over 1/2 a pound each. A one inch end mill on my buddies Bridgeport made quick work of the rims. Get a good look now, because this will be the last time these cut outs see the light of day. These puppies should still be plenty strong for tandem duty, yet save some of that rotational mass.
Monday, January 28, 2013
A Special Serial Number
Ok, so I have a little catching up to do. I promised my next post wouldn’t be another six months wait, as it was last time around - and it’s not! It is a mere five months since the last post.
The story goes like this:
I had given myself a deadline of when I would have Jessica’s bike ready for her, and it was sneaking up fast. I somehow let most of the summer go by without getting much work done on the frame and fork, so as the end of August (2012) rolled around, I found myself spending just about every night in the shop, working till midnight or so. Jessica didn’t know of this self imposed deadline, and wasn’t paying much attention to what I had been doing in the shop figuring it wasn’t of much interest to her. Little did she know...
On D day, I drove to work (instead of biking) because I had to bring the frame and fork in for final prep, chasing and facing, and assembly of the bike. I worked till 4pm, and spent another two hours getting the bike ready. It wasn’t going to be painted, but it would be otherwise complete and ridable. I drove home with her bike on the back of the Subaru, and to my surprise, her car was in the driveway, cluing me in that she was already home from work. I quickly snuck the bike into the garage without her noticing and went inside. It was kind of a crummy day out; overcast and threatening to rain. However this was more than just an average day, it was also three years to the day since we had started dating. Once inside, I suggested to Jessica that we bike from our place in Northeast Minneapolis to Sea Salt Eatery to have a nice meal and a couple pints in celebration of three years together. Sea Salt has become one of our favorite destinations for a good meal, and is a nice nine-mile ride from home, typically on our tandem. She wasn’t feeling it though, mostly because of the weather. “What if you got to ride your bike?” I asked. She knew instantly I was talking about the bike I had been building her, but couldn’t believe it was (finally) ready.
We went outside, and I showed her the bike. She had never ridden a modern road bike before, so I put it in a bike stand and was going over how the shifting worked as well as all of the other features of her new ride. When I had covered it all, I pulled the bike out of the stand and said “Oh yeah, there is one thing I almost forgot to show you. You have your own custom serial number stamped into the bottom bracket shell.” I flipped the bike over in the grass so as not to scuff up the saddle or bar tape and knelt beside it, pointing at the brass plate with the serial number in it. She had to look close to read the serial number, which read “MARRY ME”.
 And she thought the surprise of the day was that she was getting a new bike. Ha! So after initially laughing in disbelief, she did say yes. We never did make it to Sea Salt that night as we had parents to call and faceplace relationship statuses to change and whatnot, but we did go for a short ride to get a late dinner, and she got to ride her bike.
The story goes like this:
I had given myself a deadline of when I would have Jessica’s bike ready for her, and it was sneaking up fast. I somehow let most of the summer go by without getting much work done on the frame and fork, so as the end of August (2012) rolled around, I found myself spending just about every night in the shop, working till midnight or so. Jessica didn’t know of this self imposed deadline, and wasn’t paying much attention to what I had been doing in the shop figuring it wasn’t of much interest to her. Little did she know...
On D day, I drove to work (instead of biking) because I had to bring the frame and fork in for final prep, chasing and facing, and assembly of the bike. I worked till 4pm, and spent another two hours getting the bike ready. It wasn’t going to be painted, but it would be otherwise complete and ridable. I drove home with her bike on the back of the Subaru, and to my surprise, her car was in the driveway, cluing me in that she was already home from work. I quickly snuck the bike into the garage without her noticing and went inside. It was kind of a crummy day out; overcast and threatening to rain. However this was more than just an average day, it was also three years to the day since we had started dating. Once inside, I suggested to Jessica that we bike from our place in Northeast Minneapolis to Sea Salt Eatery to have a nice meal and a couple pints in celebration of three years together. Sea Salt has become one of our favorite destinations for a good meal, and is a nice nine-mile ride from home, typically on our tandem. She wasn’t feeling it though, mostly because of the weather. “What if you got to ride your bike?” I asked. She knew instantly I was talking about the bike I had been building her, but couldn’t believe it was (finally) ready.
We went outside, and I showed her the bike. She had never ridden a modern road bike before, so I put it in a bike stand and was going over how the shifting worked as well as all of the other features of her new ride. When I had covered it all, I pulled the bike out of the stand and said “Oh yeah, there is one thing I almost forgot to show you. You have your own custom serial number stamped into the bottom bracket shell.” I flipped the bike over in the grass so as not to scuff up the saddle or bar tape and knelt beside it, pointing at the brass plate with the serial number in it. She had to look close to read the serial number, which read “MARRY ME”.
And she thought the surprise of the day was that she was getting a new bike. Ha! So after initially laughing in disbelief, she did say yes. We never did make it to Sea Salt that night as we had parents to call and faceplace relationship statuses to change and whatnot, but we did go for a short ride to get a late dinner, and she got to ride her bike.
Tuesday, August 28, 2012
Half a Year Later...
It's been six months to the day since the last post. Life has been busy, but the frame and fork came together one piece at a time, and here it is:

Yay! 650c sport road bike.
The details:
44cm seat tube, 50cm top tube, normal st and ht angles, more rake/less ground trail than your typical road bike. I don't have the exact measurements on any of this handy anymore because I lost my drawing/frame design when my hard drive crashed.
No toe overlap without fenders, and a smidge with them installed.
Velo Orange 30-46 double crank
Shimano SPD pedals (currently half platform/half spd, but will be replaced with spd on both sides)
Velo Orange square taper bottom bracket
9 speed cassette and chain
105 rear derailleur
Tiagra? front derailleur
Velocity Aerohead rims (off-center rim in the back)
105 hubs
DT Swiss 2.0/1.8 spokes (3x rear, radial front), with purple nipples
650x23c Continental Gatorskin tires
700c Planet Bike fenders (made to fit 650c with an extra set of stays on the front of the front fender)
Tektro brakes
Shimano non-series 9 speed brifters
Salsa interrupter levers
Bontrager handlebar
Civia Stem (shimmed to fit a 1" steerer)
Cane Creek 40 1" external cup headset
Ritchey WCS seatpost (which will get cut down a bit as it is excessively long for this bicycle)
Brooks B17 Womens (I am letting Jess borrow my Brooks D-shaped bag for a bit just so at least she has a flat kit with her when she is out on a ride)
Is that it? Did I forget anything?
Some of the parts I have had laying around for years, some of it is brand new.
The bike will get taken apart for a rattle-can paint job (and then reassembled) to hold it over until it can get a proper powder coat. It will also get a small, stainless steel front rack with low riders for mounting panniers at some point.
That's all for now. I'll tell the story of giving the bicycle to Jessica in the next post. And I promise it will be sooner than six months from now!
The details:
44cm seat tube, 50cm top tube, normal st and ht angles, more rake/less ground trail than your typical road bike. I don't have the exact measurements on any of this handy anymore because I lost my drawing/frame design when my hard drive crashed.
No toe overlap without fenders, and a smidge with them installed.
Velo Orange 30-46 double crank
Shimano SPD pedals (currently half platform/half spd, but will be replaced with spd on both sides)
Velo Orange square taper bottom bracket
9 speed cassette and chain
105 rear derailleur
Tiagra? front derailleur
Velocity Aerohead rims (off-center rim in the back)
105 hubs
DT Swiss 2.0/1.8 spokes (3x rear, radial front), with purple nipples
650x23c Continental Gatorskin tires
700c Planet Bike fenders (made to fit 650c with an extra set of stays on the front of the front fender)
Tektro brakes
Shimano non-series 9 speed brifters
Salsa interrupter levers
Bontrager handlebar
Civia Stem (shimmed to fit a 1" steerer)
Cane Creek 40 1" external cup headset
Ritchey WCS seatpost (which will get cut down a bit as it is excessively long for this bicycle)
Brooks B17 Womens (I am letting Jess borrow my Brooks D-shaped bag for a bit just so at least she has a flat kit with her when she is out on a ride)
Is that it? Did I forget anything?
Some of the parts I have had laying around for years, some of it is brand new.
The bike will get taken apart for a rattle-can paint job (and then reassembled) to hold it over until it can get a proper powder coat. It will also get a small, stainless steel front rack with low riders for mounting panniers at some point.
That's all for now. I'll tell the story of giving the bicycle to Jessica in the next post. And I promise it will be sooner than six months from now!
Tuesday, February 28, 2012
The Jiggernaut-Bringing bicycle frame building to the masses
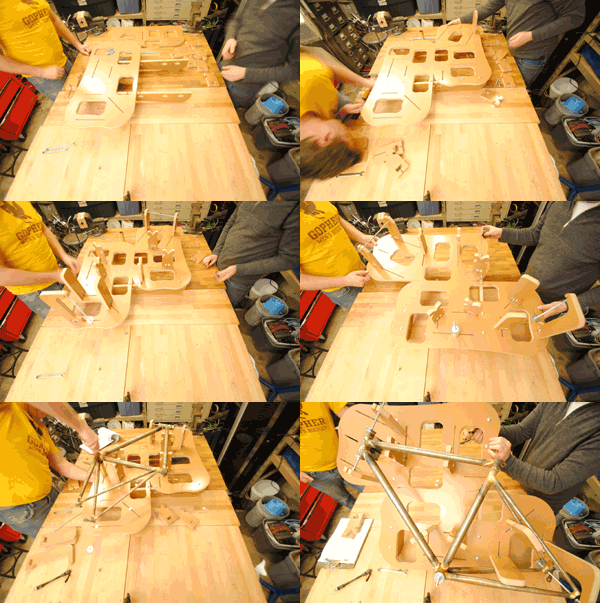
Disclaimer: I have never used this jig, I have no interest in promoting this jig other than seeing a couple of local MPLS guys succeed and seeing more people making their own shit, eh.
Friday, December 23, 2011
BB/CS/DO
Yesterday I decided it was about time to start putting together Jessica's 650c lugged road frame.

I got as far as the bb to the cs to the do.
I got as far as the bb to the cs to the do.
Tuesday, December 13, 2011
Waiting for Snow
The snow bike is more or less done. I still need to finish filing all of the fillets, add some braze-ons, and whatnot, but it is ridable. I gave it a quick and dirty (and drippy) black rattle-can paint job to keep things from turning to rust over the winter. Once winter is over, I will take the time to properly finish the frame and give it a proper powder coat. Now I just need some snow to ride it in!

I have had the bike out a few times at Theodore Wirth and Elm Creek. It is tons o' fun. I highly recommend a snow bike for anyone who lives in MN and considers themselves a mtn biker. The bike handles very predictably, is comfy, yet is stiff enough that my 2-3mm of clearance between the chain and the tire are not an issue.

I definitely have to put the bike underneath me when cornering otherwise the Endomorph's tend to slide. This is only an issue when I am too tired to ride properly. Perhaps I will get some knobbier tires for next year. The Hammerschmidt is awesome. I am not man enough to rock a single speed snow bike, but the two speeds of the Hammerschmidt is perfect for the local trails. My current trail riding ratio is 35.2:23 (1.53) normally and 22:23 (.96) when I can't hack it in the "big ring" anymore. The front and rear wheels are interchangeable, and I currently have a 20 tooth cog on the front in case I wanted to ride some bike path. We'll see if I have to change these ratios up with different snow conditions as opportunity presents itself. As for now all of our precip. has been replaced by rain :(
Next up for this frame is a rack or two for adventure camping trips and the occasional snow day commute.
I have had the bike out a few times at Theodore Wirth and Elm Creek. It is tons o' fun. I highly recommend a snow bike for anyone who lives in MN and considers themselves a mtn biker. The bike handles very predictably, is comfy, yet is stiff enough that my 2-3mm of clearance between the chain and the tire are not an issue.
I definitely have to put the bike underneath me when cornering otherwise the Endomorph's tend to slide. This is only an issue when I am too tired to ride properly. Perhaps I will get some knobbier tires for next year. The Hammerschmidt is awesome. I am not man enough to rock a single speed snow bike, but the two speeds of the Hammerschmidt is perfect for the local trails. My current trail riding ratio is 35.2:23 (1.53) normally and 22:23 (.96) when I can't hack it in the "big ring" anymore. The front and rear wheels are interchangeable, and I currently have a 20 tooth cog on the front in case I wanted to ride some bike path. We'll see if I have to change these ratios up with different snow conditions as opportunity presents itself. As for now all of our precip. has been replaced by rain :(
Next up for this frame is a rack or two for adventure camping trips and the occasional snow day commute.
Saturday, December 3, 2011
Nearly Ridable
Another night till 1am in the garage. I ran out of acetylene, but only need to put on the seat post collar yet. I am going to bring the frame and fork in to work to mill/face/chase everything. Then slap some parts on 'er, and it should be ridable. ...with a lot of clean up to do on the fillets, and in need of a paint job, but ridable.

Now I just have to get the bath tub cleaned up before Jessica finds this mess!
Now I just have to get the bath tub cleaned up before Jessica finds this mess!
Friday, December 2, 2011
Making Progress
It has been a while since I have posted, so here is a terrible photo to show that I am actually making progress.

My friend is building up a Pugsley, so that served as a good kick in the pants to get this bike done. There is not much left now. One more fillet on the frame, some facing and chasing, a disc mount on the fork, the seat post binder, perhaps some cable guides, etc, ...and a heck of a lot of clean up work on the fillets.
By the way, if you have, or know of anyone that has, a 27.2 seat tube reamer, let me know - I need to use one if I ever hope to get a seat post in this frame!
My friend is building up a Pugsley, so that served as a good kick in the pants to get this bike done. There is not much left now. One more fillet on the frame, some facing and chasing, a disc mount on the fork, the seat post binder, perhaps some cable guides, etc, ...and a heck of a lot of clean up work on the fillets.
By the way, if you have, or know of anyone that has, a 27.2 seat tube reamer, let me know - I need to use one if I ever hope to get a seat post in this frame!
Tuesday, November 1, 2011
Back At It!
Its been quite a while since I have updated, but here is a photo of how things are shaping up. 
I moved a few months ago, and lost all my momentum on the project. Now my new shop space is in complete chaos, so things are back to normal. I have been doing little bits here and there, but haven't bothered to post an update on the frame, so here ya be!
This bike will be ready in time for winter. This bike will be ready in time for winter. This bike will be ready in time for winter!
I moved a few months ago, and lost all my momentum on the project. Now my new shop space is in complete chaos, so things are back to normal. I have been doing little bits here and there, but haven't bothered to post an update on the frame, so here ya be!
This bike will be ready in time for winter. This bike will be ready in time for winter. This bike will be ready in time for winter!
Tuesday, May 17, 2011
Jessica's Lugged 650c Road
Jessica is short. I am building her a 650c lugged road frame so she can have a bike that fits proper and doesn't have to use silly geometry to make everything work with 700's. Its gonna be dang sweet. Here is the start of it:

Wednesday, March 30, 2011
Beer Irony
Oh, sweet and precious free time, where dost thou go?!
Not much work getting done on the bicycle these days. I am not half way done with the snow bike, and I already have my next frameset project figured; a road bike for Jessica.
I have, however, at least made some good headway on a fork jig that will be able to accommodate both regular forks, suspension corrected forks, and fattie snow bike forks with 135 o.l.d. spacing. I'll get some photos posted of that when it is finished.
Things that have been taking up my free time include (but are not limited to) learning about raising chickens in my yard, scheming on expanding my garden, and of course, homebrewing. Here is an Imperial Stout I brewed up in July of '10. I just bottled it a week ago. It is blacker than black, thick as motor oil, and as my friend Angela says, "It's like taking a drink of earth." It is certainly a sipping beer, but dang is it tasty!

Imperial Stout in a Schlitz glass. Isn't it ironic, don't you think?
Not much work getting done on the bicycle these days. I am not half way done with the snow bike, and I already have my next frameset project figured; a road bike for Jessica.
I have, however, at least made some good headway on a fork jig that will be able to accommodate both regular forks, suspension corrected forks, and fattie snow bike forks with 135 o.l.d. spacing. I'll get some photos posted of that when it is finished.
Things that have been taking up my free time include (but are not limited to) learning about raising chickens in my yard, scheming on expanding my garden, and of course, homebrewing. Here is an Imperial Stout I brewed up in July of '10. I just bottled it a week ago. It is blacker than black, thick as motor oil, and as my friend Angela says, "It's like taking a drink of earth." It is certainly a sipping beer, but dang is it tasty!
Imperial Stout in a Schlitz glass. Isn't it ironic, don't you think?
Friday, February 25, 2011
First Burn

I haven't gotten much work done on my bicycle lately. It is cold in the garage, and life has kept me busy. I have, however, more or less finished my homebrewed hot tent camp stove. It burns very nicely and has a good draw to it. I will be adding a cast iron damper, and making the legs more rigid; but not too shabby for my first stove. It was made out of one 2'x4' piece of sheet metal, a piece of expanded metal, and some stove pipe.
Monday, January 24, 2011
Hot Stuff!
 Instead of working on my bicycle lately, I have been doing some other metal-work in my free time. I have been fabricating my own variation of a stove to be used while hot-tent camping. At some point between now and next winter, I intend to make a tent and a pulk/toboggan hybrid to haul all my hot-tent camping gear for future adventures next winter. More to come once I finish this...
Tuesday, January 18, 2011
Useless Excuses
I ran out of gas, then I ran out of brass. Those had to be refilled and restocked, but I had to wait till payday. Last week I threw out my back, and as a result, I haven't been biking. This in turn means my energy level is noticeably lower, which then means I don't make it out to the garage after work to put in time on the frame.
This changes today! No more excuses. Time to get back at it! ...after eight hours of beauty rest and my morning coffee, that is.
Goodnight all. Look for more post(s?) in the next couple of days.
This changes today! No more excuses. Time to get back at it! ...after eight hours of beauty rest and my morning coffee, that is.
Goodnight all. Look for more post(s?) in the next couple of days.
Wednesday, December 22, 2010
One Joint A Night

My goal is to do one joint a night, 5 days a week. A co-worker of mine suggested I clarify that I am talking about bicycle frame joints. So yeah, one bicycle frame joint per night. Usually it means cleaning up a joint that went into the trusty Home Depot orange soak bucket the night before, hand mitering the next joint, brazing it up, letting it cool (not much of a challenge in my MN garage), and throwing it in the soak. With the holidays and just life in general happening, this goal is a far stretch from reality, but one has to aim high. The last half of a week I have spent all my free time eradicating ice dams from an out-of-town friends roof. Next; friends in town and holidays and whatnot. Baby steps to getting this frame done.
Thursday, December 16, 2010
Fatties Fit Fine

I am doing some sort of a sectional type chainstay for ultimate stiffness. The clearances are pretty tight getting an Endomorph on a Graceful Fat Sheba, the chain stays, and a Hammerschmidt on an 83mm shell all to fit. The chain only clears the tire by a few mm, so I can't afford to have things too flexy back there!
Subscribe to:
Posts (Atom)